Sunday, 1 March 2015

Pina Colada Cupcakes


Pina Colada Cupcakes

These cupcakes are potentially the most exotic specimens I've made ever. When I choose a cupcake, I don't normally pick anything coconutty or pineappley, however I was pleasantly surprised by these. When you have so many flavours going on, I think it's important to show what's on the inside, on the outside (famous words by Mary Berry I think??) Hence the bits of fruit and coconut chunks. As well as this, to show the cocktail get-up, you can't show these beautiful cupcakes off without a straw and a bit of bling. Of course if you're going to keep these to yourself, the get-up is not necessary ;) Additionally, if you want to add actual rum or other alcohol to this recipe, I ain't gonna judge (I just thought non-alcoholic cake would be more acceptable eat at tea time!)


For the cupcakes:
6 oz / 150g caster sugar
6 oz / 150g margarine
6 oz/ 150g self-raising flour
3 eggs
2 oz / 50g desiccated coconut
2 tablespoons coconut cream
1 teaspoon rum essence
1 tablespoon pineapple juice (use excess from the can you will use)
1oz / 25g dried pineapple

For the Filling:
200g tin pineapple ( drained +1-2 tablespoons of the juice)
2 tablespoon caster sugar
2 teaspoon corn starch

For the Buttercream and Topping:
8oz / 200g icing sugar
4 oz / 100g unsalted butter (softened)
2 tablespoon coconut cream
1 tablespoon milk
-desiccated coconut
-fresh pineapple chunks, glacé cherries, fresh coconut, straws, edible glitter
*cocktail sticks

1) Preheat oven to 180°C / Gas 4. Line a muffin tin with muffin cases and set aside.

2) Make the Cupcakes: Cream margarine, sugar, coconut cream, rum essence and pineapple juice together until pale and fluffy. Beat the eggs in a separate bowl. Add a bit of egg and sieve a little of the flour into the creamed butter-sugar mixture at a time, mixing well after each addition. In the last addition of flour, add the desiccated coconut. Chop the dried pineapple into small pieces and stir through the cake batter.

3) Spoon the mixture evenly into the muffin cases and bake in the preheated oven for 20-25 minutes or until golden, springy to the touch and an inserted skewer comes out clean. Allow to cool on a wire rack.

4) Meanwhile make the Pineapple Filling: Put the pineapple, juice, sugar and corn starch into a saucepan and bring to a boil. Turn down the heat to a simmer and keep on the heat until thickened. Mash the pineapple chunks to create a smoother texture. Allow to cool.

5) Make a small hole in the middle of the cupcakes (perhaps an apple corer would be useful for this). Pipe or spoon the pineapple puree into the hollows made.

6) Make the Buttercream: Cream the butter, milk and coconut cream together to soften. Gradually sieve in the icing sugar and cream after each addition, continuing to mix until light and spreadable. Spread or pipe onto the cupcakes and decorate with desiccated coconut and edible glitter if desired. To create the cocktail get-up push pineapple chunks and glacé cherries onto the cocktail sticks and push into the cupcakes. Trim the straws to fit the cakes and push into the sponge, alongside the cocktail stick. Place a bit of fresh coconut onto the cakes wherever there's space after you've adhered them with everything else. Enjoy alongside some real alcohol.


Saturday, 21 February 2015

Strawberry and Raspberry Daiquiri Cupcakes


Last week I was asked to contribute to some cupcakes for a charity cocktail evening. My friend from the society, which organised the event, said to make about 50 cupcakes as they already had a professional bakery contributing about 70. Now I could have made 50 vanilla cupcakes. But with the cocktail theme I just couldn't quite leave it at a drop of vanilla extract. So I mind-mapped what I could make and settled on 5 flavours:
Strawberry Daiquiri,Pina Colada,Mohito,Salted Maple and Milk Chocolate,Plain Jane Vanilla (posh name for just vanilla). 
The Salted Maple and Milk Chocolate Cupcake I admit is not a cocktail (though there should be one with these flavours!), however I just thought of it at midnight after baking the other 4 flavours and thought it'd be a nice idea. Similarly I accept that the Vanilla cupcake is also not a cocktail, however I don't think you can have a collection of cakes without the classic vanilla playing a starring role. I will be posting all five recipes for the above cupcakes. Let's start with a strawberry daiquiri...now where's that beach and sunshine to go with it... (goes and wonders to the airport with suitcase and sunglasses in tow).

For the Cupcakes:
6 oz / 150g caster sugar
6 oz / 150g margarine
6 oz/ 150g self-raising flour
3 eggs
1 teaspoon rum essence
5-6 strawberries (finely diced)
2 packets (40g) fruit flakes, like these
12 raspberries
Pink food colouring (1 teaspoon liquid colouring or ½ teaspoon colouring paste)

Filling (Strawberry and raspberry puree):
8 oz / 200g mixture of strawberries and raspberries (diced)
2 tablespoons icing sugar
1 teaspoon corn starch

Buttercream Icing:
4 oz / 100g soft unsalted butter
1-2 tablespoons of the strawberry and raspberry puree (above)
10 oz / 250g icing sugar
Dash of pink food colouring (if necessary)
Decoration:
6 strawberries (halved lengthways), 12 raspberries, 12 mint leaves, freeze-dried strawberries, glitter

Method
1) Make the cupcakes: Preheat oven to 180°C / Gas 4. Line a 12 hole muffin tin with paper cases. Cream the caster sugar and margarine with the rum essence and pink food colouring. In a separate jug, whisk together the eggs. Bit by bit add the beaten egg and sieve the flour into the butter-sugar mixture, mixing after each addition. The batter should be ‘just drop off the spoon’ consistency.


Stir through the diced strawberries and fruit flakes. Spoon evenly into the muffin cases, pushing a raspberry under the batter of each one. 


Bake for 20-25 minutes or until an inserted skewer comes out clean. Cool on a wire rack.


2) Make the puree: Place the strawberries, raspberries, icing sugar and corn starch in a saucepan on a low heat. Once the sugar has melted increase the heat slightly to bring the berries to a simmer. Continue to simmer until the mixture has thickened slightly Use a masher to squash the berries (alternately blitz them in a food processor beforehand). Sieve the berries, using a spoon to get the most out of the berry pulp. Discard the pulp and set your fresh puree aside to cool.

Pre-simmer puree

Simmered and sieved puree, ready to use.
3) Once cooled, pipe the puree into the centre of each cupcake, leaving at least 2 tablespoons for the buttercream.

4) Make the buttercream: Cream the butter and a dash of milk together. Add the berry puree and food colouring, if using, and gradually sieve in the icing sugar whisking well after each addition (I always find an electric mixer does the best job here). Once all of the ingredients are well combined, the icing should be smooth and spreadable. Due to the addition of the puree, the icing could curdle; if this happens keep adding icing sugar and beating it into the icing well until the curdling disappears. Spread or pipe icing onto the cupcakes and decorate as desired with the berries, mint leaves and optional freeze-dried strawberries and glitter. If you’re feeling extra crazy stick a straw in each cupcake to mimic the cocktail get-up. Now pretend you’re in an exotic beach-front setting, watching the sun go down over the glistening sea.


Saturday, 7 February 2015

Fondant Fancies Two Ways!

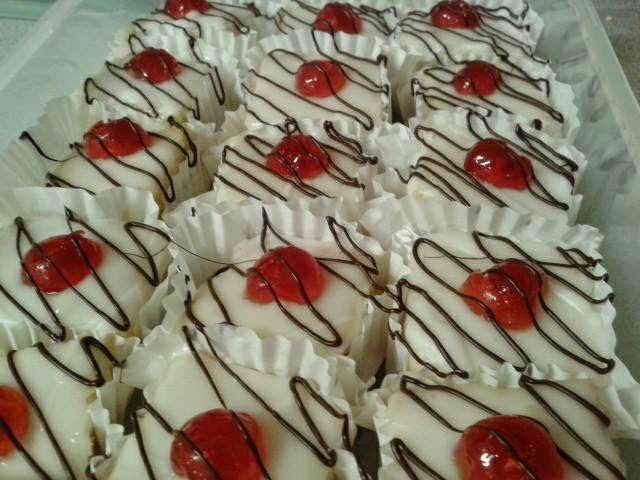
So it was my turn on the weekly cake rota in my German class on Thursday and I racked my brains for a while to think what I could make that’s acceptable to eat at 10:30 in the morning. I mean…chocolate fudge cake is not really elevenses material is it, nor is a salted caramel cupcake. I thought it had to be something basic basic but also a bit pretty too. Then fondant fancies came to mind because they’re light, not too sweet and actually quite impressive-looking when they’re finished! For some reason I thought one tray would not suffice so I did two, which then lead onto two different flavours of fondant fancies, which then lead to 40 cakes!!! What was a light bake for my class turned into a cake mission, but I’m not complaining- the result was well worth it!
Now you’d think 40 cakes!!! Does this girl live with an army?! Or is she just really hungry!? Well…I took 15 into my class, all of which got eaten, and I left 25 in my flat. I came home and thought there is no way we’re going to be able to eat 25 of these, I’ll have to take some to work…give some to family…freeze some….
But oh no no no no no. It turns out as well as being lovely people, my flat mates also have a talent for cake eating too (It's not been 2 days and we have one left minus its cherry...). So thanks to them I can now bake much more frequently without worrying about the waste. I just hope they don’t
think I’m trying to fatten them up…


Anyway here’s my recipes for Bakewell Fondant Fancies and Plain Jane Vanilla ones:


BAKEWELL FONDANT FANCIES
For the Cake:
200g / 8 oz caster sugar
200g /8 oz margarine
150g / 6 oz self-raising flour
50g / 2 oz ground almonds
1tsp almond extract
For the Filling:
6 tbs apricot jam
4 tbs strawberry/raspberry jam
250g / 10 oz white marzipan
For the Icing and Extras:
750g fondant icing sugar
6-8 tbs water
20 halves of glacé cherries
75g / 3 oz dark chocolate
*muffin cases

1) Preheat oven to 180°C / Gas 4. Grease and line a deep rectangular tin approximately 6 x 8 inches.

2) Make the Cake: Cream margarine, caster sugar and almond extract together until pale. Beat the eggs in a separate jug and sieve the flour and ground almonds into a third. Add a third of the flour and egg mixture at a time and beat after each addition, until a smooth batter is formed (It should be a ‘just drops off the spoon’ consistency). Spoon the batter into the tin and bake for 25-30 mins, or until springy to the touch and an inserted skewer comes out clean. Turn out onto a wire rack and allow to cool.

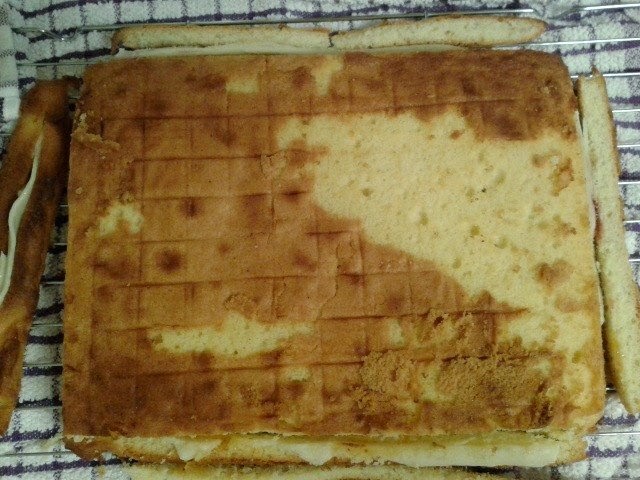
3) Fill the Cake: Once cooled, carefully trim up the top and edges until they’re straight and slice the sponge in half horizontally. Spread each half with the apricot jam. Sprinkle the work surface with a little icing sugar and roll out half of the marzipan at a time, roughly the shape of the cake and place each half onto the cake halves. Spread one of the halves with the strawberry or raspberry jam and sandwich the other cake on top. Chill the cake for about 1 hour, to make the cake more manageable.

4) Measure the cake and divide into 20 squares (I found that 4x4.5cm worked best). Place the cakes on a wire rack, with a baking tray or tin foil underneath it – it’s about to get rather messy ;).


5) Decorate the Fancies: Sieve the icing sugar into a bowl and add the water sparingly until a runny paste is formed, just thinner than the consistency of golden syrup. Spoon a tablespoon-worth amount of icing over each cake and encourage it to go over the sides with the spoon or a knife. Give each cake a good spoonful first before you do any fill in the gap/ touch ups on any of the cakes. Place a cherry half on each cake and allow to dry for a couple of minutes. 


6) Meanwhile fold the muffin cases out flat; imagining a square base, fold edges into the middle four ways to make a kind of square shape. 
Take each cupcake and place in a case, roughly wrapping the sides around the cake to make sure it sticks to the icing. Tightly pack the fancies in the tray you baked the cake in, to encourage the cases to stick to the cakes in a square shape.


7) Melt the chocolate and allow to cool. Once the icing is dry, pipe or drizzle the melted chocolate over the fondant fancies. Devour.

-------------------------------------------------------------------------------------------------------------------------

PLAIN JANE VANILLA FONDANT FANCIES

For the Cake
200g / 8oz caster sugar
200g/ 8oz margarine
200g / 8 oz self-raising flour
4 eggs
1-2 teaspoons vanilla extract.

Decoration
Buttercream:
150g / 6 oz icing sugar
75g / 3 oz soft unsalted butter
1 tsp vanilla extract
Iced Topping:
750g / 1 lb 14 oz fondant icing sugar
8 tbs water
food colourings (pink, blue, green, yellow etc)
Muffin cases
75g chocolate of your choice (white, milk or dark)
*Any sprinkles, glitters etc that take your fancy.

1) Preheat oven to 180°C / Gas 4. Grease and line a deep rectangular tin (8x12 inches approximately).
2) Make the Sponge: Cream the margarine, caster sugar and vanilla extract until pale. Beat the eggs in a separate jug and sieve the flour into a separate bowl. Add a bit of flour and egg at a time to the butter-cream and mix to combine after each addition. Repeat until all ingredients are used up. Spoon into the tin and bake for 25-30 minutes until golden, springy to the touch and a skewer comes out clean. Turn out onto a wire rack and allow to cool. Trim the edges until they are straight, including the top if it’s a little uneven.

3) Make the Buttercream: Put the butter and vanilla extract in a bowl. Gradually beat in the icing sugar (so as to avoid an icing sugar cloud), until the icing is pale and spreadable. Smooth 2/3 of the icing onto the cooled cake, taking care to make the surface as even and flat as possible. Chill for an hour to set the icing, and keep the rest of the buttercream alongside it in the fridge (I find it easier to leave the icing in a piping bag so it’s ready to use in the next step.

4) Once chilled enough, measure and divide the cake into 20 square cakes (4x4.5cm did it for me). With a round nozzle pipe a globule of icing onto the centre of each square. You can chill the cakes again after this step for 30 minutes or so, but I didn’t find it necessary.

5) Make the Iced Topping: Sieve the icing sugar into a bowl and sparingly add the water until it forms a smooth runny paste, just thinner than golden syrup. Divide into as many bowls as you have food colourings. Colour the icing as desired and pour a heavy tablespoonful onto each cake, encouraging it to fall over the sides (be wary of the buttercream dome though!). Try to leave icing remaining so you can fill in any gaps left over. At this stage, add any sprinkles you fancy. Allow to set a little.

6) Meanwhile flatten out the muffin cases and fold the edges in four ways, as if the base is a square. Place each fondant fancy into a case and fix the sides to the icing. Tightly pack them into the rectangular baking tin you baked the cake in, so that the cases stick to the fancies. Allow to dry.


7) Melt your chosen chocolate and allow to cool before piping or drizzling over the fondant fancies. I also like to finish them off with a sprinkle of glitter. Enjoy.


Wednesday, 24 December 2014

My Mince Pies

I think everyone has their own little recipe for mince pies. Or if you're my sister and don't like mincemeat- jam pies. Get creative with the tops- I personally like a top that doesn't completely hide the filling such as a little star or a cut-out design. Go crazy, it is Christmas after all ;).

Ingredients

9 oz/ 225g plain flour
5 oz/ 125g butter (diced)
2 oz/ 50g icing sugar
1 egg (beaten)
Zest of an orange
Jar of mincemeat/jam (for people who don’t like mince pies)
1 egg yolk mixed with a tablespoon of cold water (for the egg wash)


1) Grease a 12 hole bun tin and set aside.

2) Sieve the flour into a mixing bowl and add the butter. Rub the butter and flour together to a breadcrumb consistency. Sieve and stir through the icing sugar, following with the orange zest. Make a well in the centre and add the beaten egg. Use a fork to begin incorporating the dough into the egg and then once it becomes too stiff to stir use your hands to form a smooth ball of dough. Wrap in cling-film and refrigerate for 20-30 minutes. Now preheat your oven to 180°C/ Gas 5.

3) Halve the dough. Roll one half out to the thickness of a £1 coin and cut out 12 circular bases and put them in the tin. Roll out the other half of the dough and cut out 12 tops (you can get creative here- stars, circles..whatever you prefer)

4) Drop 1-2 teaspoons of mincemeat or jam into the bases and follow with the tops. Brush with the egg wash and bake for 20 minutes or until golden brown. Allow to cool in the tin for 5-10 minutes before transferring to a cooling rack. Dust liberally with icing sugar.

Mini Yule Logs

I love a yule log at Christmas. The problem however is that by the time me and my family are done with the all the other rich Christmas food (ie Christmas dinner, pudding, trifle, cheese and crackers, chocolate...) we never get round to eating this little beauty of a swiss roll. So I had a brain wave: make them mini! Let's face it, everything else at Christmas comes in excessive portions so if you have just a small slither of this yule log you don't feel like you're over-indulging. If you eat the whole of one of these logs though...that's not quite the case ;).


Ingredients (Makes 2)

2 oz/50g caster sugar
2 eggs
2 oz/50g plain flour
1 tablespoon cocoa powder

Filling and icing:
10 oz/250g icing sugar
5 oz/125g soft unsalted butter (diced)
1 tablespoon cocoa powder
½ tsp vanilla extract
*caster sugar for assmembly

1) Preheat oven to 180°C/ Gas 5 and grease and line a swiss roll tin.
2) Set a heatproof bowl over a pan of just simmering water. Whisk the eggs and sugar over the heat with an electric hand-mixer until thick in consistency and doubled in volume. Take off the heat.

3) Sieve in the flour and cocoa powder and fold through the egg and sugar mixture with a metal spoon.


4) Pour the batter into the swiss roll tin. Rotate the tin to encourage the batter to spread into the corners. Bake for 10 minutes or until springy to the touch. Cut a square of greaseproof paper, set on the work surface and sprinkle with caster sugar.

5) As soon as the sponge comes out the oven roll it! Flip the sponge onto the greaseproof on the work surface, peel the paper off the sponge and starting with the long edge closest to you, roll the sponge and the greaseproof up into a tight spiral. Leave to cool.

6) Make the buttercream: Put the butter in a mixing bowl and wiz with an electric hand-mixer to soften. Gradually sieve in the icing sugar a few tablespoons at a time and whisk with a dash of milk after each addition. Take a third of the butter cream and place in another bowl, add the vanilla extract with a dash more icing sugar and mix to combine. Sieve the cocoa powder into the rest of the buttercream and whisk until incorporated.

7) Once cooled, unroll the swiss roll and spread with the vanilla butter cream. Roll back up.

8) Cut the swiss roll in half at an angle. Cut another smaller piece off the end of each piece to be the stumps of the branches. With a bit of icing adhere each stump to the logs at an angle.


9) Cover the logs with the chocolate buttercream and use a fork to make small peaks in the icing, mimicking the bark of a log. Allow the icing to set a little before dusting with icing sugar ‘snow’ and a sprig of holly if you're feeling reaaallllly festive :).
Merry Christmas!


Friday, 19 December 2014

Strawberry ‘Jaffa Cakes’

I baked these ageeeesss ago but I never got round to posting the recipe. I came across a few recipes for jaffa cakes such as this one from the BBC. It seems it's quite the thing now to try to recreate our favourite shop-bought cakes and biscuits, so I thought I'd give it a go. Partly because I wanted to try something different and also because I had no orange jelly in the house, I decided to change the orange flavour for strawberry instead. Chocolate and strawberry is always a good combination, and it doesn't fail in this situation either :).


2oz/ 50g caster sugar
2oz/50g plain flour
2 eggs
½ pack strawberry pre-packaged jelly cubes
4oz/100g dark chocolate

1) Preheat oven to 180°C/350F/ Gas 4. Cut out 12 little circles of grease-proof paper and use to line a 12 hole muffin tin.

2) Set a heat-proof bowl over a pan of just simmering water, ensuring the bowl does not touch the surface of the water. Whisk the eggs and caster sugar together until the mixture has thickened and doubled in volume (it is much easier to use an electric hand-whisk for this).


3) Take the bowl off the heat. Sieve and fold one tablespoon of flour into the batter at a time, being careful not to knock the air out too much.

4) Put one tablespoon of the batter into each muffin hole and bake for about 8-10 minutes, until golden brown and springy to the touch. Take out of the muffin tin and allow to cool.


5) Make up the jelly, reducing the amount of water required to make half the amount of jelly that a full packet would make. Line a baking tray with cling film and pour in the jelly until it reaches a depth of about 1cm. Allow to cool completely before placing in the fridge to set.

6) Melt the chocolate and set aside to cool. Use a cookie cutter smaller than the circumference of the sponges to cut circles of jelly. Place one circle of jelly onto each sponge and place on a wire rack. Spoon each cake with the chocolate, smooth to neaten up a bit and allow the chocolate to drip off the cakes (it’s a good idea to place a sheet of tin foil or cling film under the wire rack before you do this!) Allow to set and devour when necessary.


Monday, 13 October 2014

Jam Roly-Poly

 Okay, I’m going to say something completely British now: the weather’s been rather rubbish lately hasn't it? In the past week, it has sadly become clear that Autumn is officially underway. There’s been wind, rain, wind and rain at the same time...and it’s been rather chilly. My umbrella’s been battered and I've cracked out the coat. So to stop myself feeling blue that the summery weather is officially over, I begun to think of all the positive things that Autumn and Winter can bring: the crunch of fallen leaves under foot, the cosy feeling of being inside in the warm while the rain patters on the window pane, woolly jumpers, hugs that feel even warmer because it’s cold outside…and food! Soothing soup and stews, roast dinners…followed by a nice stodgy pudding to fill you up. Obviously my mind stuck on this last part, being such a pudding kinda gal ;), so I decided to make my first autumnal pudding of the year (granted I have made apple crumble recently but don’t you think that’s an all year round kind of pudding?)


200g/8oz  self-raising flour
100g/4oz suet
100-150ml/3.5- 5 fl oz. water
3 tablespoons light brown soft sugar.
4-5 tablespoons jam
*Custard to eat it with...


1) Preheat the oven to 180°C/ 160 Fan/ Gas 4. Half fill a roasting tin with just-boiled water and place in the bottom of the oven. Cut equal sized pieces of foil and baking parchment (as big as the tray you will bake the roly-poly on). Ensure to lie the baking parchment over the top of the foil.

2) In a bowl, combine the flour, suet and sugar. Make a well in the centre and pour in a little water. Mix the water in with your hands, adding more to make a smooth, unsticky dough. You may need to add more or less water so be sparing with it. If you add too much (like I did) add a dash more flour.

3) Sprinkle the work surface with flour and roll out the dough to a square, roughly 25x25cm, or until the dough is about 1.5 cm thick (no matter how big, it is important to keep to the form of a square).

4) Spread the jam over the dough, leaving a margin all around of about 2.5cm. Brush a little water around this margin and, starting from the side closest to you, roll the dough in on itself like a Swiss- role. Squeeze the ends to prevent the jam from escaping (I cut the nibs off just to make it a bit neater).  You should end up with a smooth sausage shape. Carefully lift the roly-poly onto the middle of the baking parchment, sealed-side down. Loosely wrap the baking parchment and foil around the pudding, leaving a little room for the pastry to expand. (The advantage of using foil is that it keeps the baking parchment in place). Twist the ends of the parchment/foil like a sweet wrapper and you’re ready to bake.

5) Bake on the middle shelf of the oven for 40 minutes. Allow to cool for 10 minutes before eating, as the jam will be very hot! Always serve with steaming custard.