Thursday, 7 August 2014

Neapolitan Cake

This recipe was co-created by my best friend Elisa Morris and myself.
We’re always trying to think of new ideas to put into a cake. So this is the result of our latest catch-up; an ice-cream as a cake!
Sponges:
6oz caster sugar
6oz margarine
6oz self-raising flour
3 eggs (beaten)
2 tablespoons strawberry milkshake syrup
2 tablespoons cocoa powder + 1 tablespoon milk
2 teaspoons vanilla extract
¼ teaspoon pink food colouring paste
Buttercream icing:
10oz butter
20oz icing sugar
Approx. 3 tablespoons milk (Plus extra for the chocolate buttercream)
2 tablespoons strawberry milkshake syrup
3 tablespoons cocoa powder
1 teaspoon vanilla extract
Extra: holographic edible glitter

1) Preheat the oven to 180°C/ Gas 4/ 350F. Grease and line three round sandwich cake tins.
2) Cream the margarine and caster sugar together until pale and fluffy. Gradually sieve a bit of the flour followed by a drop of beaten egg into the bowl and mix to combine. Repeat this process until nearly all of the flour and all of the eggs are incorporated into the batter.
3) Make the chocolate sponge: Spoon a third of the batter into a small bowl. Sieve in the cocoa powder, add the milk and mix until well combined.
4) Fold the rest of the flour into the unflavoured batter. Put half of this mixture into another small bowl and add the vanilla extract, mixing to combine.
6) Add strawberry milkshake syrup and the pink food colouring to the rest of the unflavoured batter and mix until a strong pink colour has been achieved.
7) Bake in the oven for 15 minutes or until the cake is springy to the touch and a skewer inserted comes out clean (you may find as I did, that there is only enough room in the oven for two cakes on the same level at a time- this is totally fine- just bake the third sponge when the first two are cooling.)
8) Make the buttercream icing: Place the butter in a mixing bowl and add a drop of milk. Give this a mix until the butter is nice and soft. Gradually sieve in a couple of tablespoons of icing sugar and mix into the butter with a drop of milk. Repeat this process until all of the icing sugar has been used up and the butter icing is soft and light- you might not need to use all of the milk for this. Divide the icing into three bowls.
9) Mix vanilla extract into the first amount of icing. Into the second amount add the strawberry milkshake syrup and pink food colouring and beat until it reaches an even colour. Into the third amount, sieve in the cocoa powder and add a tablespoon of milk. Mix to combine, adding more milk if the mixture is too stiff and more icing sugar if it is too loose.
10) Assemble the cakes: One at a time slightly scrape against the sides of the cakes to reveal the colour of the sponge inside. At the same time as doing this you can ensure that you are cutting the sponges into the same shape. After trimming one cake, I like to put the second on top of it so I have an idea how much I should or should not scrape off the cake. Although the aim here is not to cut a lot off of the sponges, during this process you will naturally change the shape of them so it is important to constantly compare them so they don’t end up different sizes to each other.
11) Spread a little of any icing onto the cake board so that the sponge cake stays in place. First, place the chocolate sponge on the board and spread with half of the chocolate buttercream, leaving a 0.5cm margin to allow for the icing to spread with the weight of the sponges on top. Next place the vanilla sponge on top and spread with half of the vanilla icing. Lastly, place the strawberry sponge on top.
12) Fit three piping bags with medium star nozzles and fill with the remaining amounts of buttercreams. Use a ruler to make even markings on the sponge, scoring two vertical lines in the middle of the cake, essentially making three vertical sections on the cake (think of a tub of Neapolitan ice-cream and you’ll know what I mean).
13) Do the outside edges first: Use the strawberry butter cream to slowly pipe around the first edge section of the cake and fill in with lines of the icing (See picture below).


14) Line the corresponding bottom edge of the cake with dots of icing; gradually pipe one horizontal line after the other on top of the previous line of icing, until you reach the top of the cake. Repeat this process with the other edge section of the cake with chocolate icing (See picture below).


15) Allow to dry for a couple of minutes before you do the same process with the vanilla icing in the middle section of the cake. Now your cake should be completely covered in icing.


14) Dust with a little holographic edible glitter for an extra sparkle and enjoy!


Tuesday, 29 July 2014

Millionaire Cupcake Surprises

Millionaire Cupcake Surprises
One of my favourite baked goods is millionaire shortbread. I also love cupcakes. So I thought…why not combine the two? This recipe makes six big vanilla cupcakes filled, filled with caramel, topped with chocolate fudge icing and a bar of gold to boot!

In this recipe, I have suggested either vodka or ouzo for the gold paint on the fondant gold bars, because I didn’t have any vodka in the house when making these (honest!), so my Nan suggested I crack open my Grandad’s bottle of ouzo that was casually sitting on the kitchen side. I don’t normally say alcohol is necessary in life to have a good time, however in this case you can’t replace the vodka with anything else, such as water. In fact, when I googled possible replacements for alcohol, I found out that god lustre powder is not water soluble, therefore if you were to mix this gorgeous golden powdery stuff with water, the two wouldn’t mix together very well and you’d end up with a clumpy mess. If you use alcohol however, it creates a smooth liquid which adheres to such surfaces as fondant, very well. Essentially, this is one of the very rare times I will say: don’t scrimp on the alcohol this time guys ;)….anyway here’s the recipe (the caramel is inspired by my favourite millionaire shortbread caramel recipe by Simon Rimmer and complimented by the chocolate fudge icing recipe by womanandhome.com). Enjoy J.

Ingredients

For the sponge:
100g/4oz margarine
100g/4oz caster sugar
100g/4oz self-raising flour
2 eggs (beaten)
1 teaspoon vanilla extract

For the caramel:
100g/3 ½ oz butter
200g/ 7oz condensed milk
2 tablespoons golden syrup

For the chocolate fudge icing:
100g/4oz dark chocolate
50g/2oz butter
175g/ 7oz icing sugar

Extras/ bars of gold:
150g/6oz white fondant icing
Gold lustre powder (available in cake shops)
A drop of vodka/ouzo
*chocolate covered popping candy.

Method

1) Firstly make the gold bars. Sprinkle a work surface lightly with icing sugar and roll out the fondant icing to 1.5cm thick. Cut rectangles of approximately 5x2cm. With a knife or ruler, slightly dent all four sides of the rectangle, the innermost edge pointing towards the top (ie, so that the rectangle is moulded into a trapezoid shape). When you’re happy with the shape engrave the word ‘GOLD’ into the top of the bar with a cocktail stick- I like to trace the letters out with small dots first then gradually scrape the engraving into the surface. Set aside to dry.

2) Make the sponges: Preheat the oven to 180°C/ Gas 4 and line a muffin tin with 6 cases. Cream the margarine, caster sugar and vanilla extract together until pale and fluffy. Sieve in the flour, add the eggs and mix the batter until everything is combined. Spoon the mixture evenly into the muffin cases, levelling the tops. Bake for approximately 20 minutes- until the cupcakes are springy to the touch or an inserted skewer/knife comes out clean. Set aside on a cooling rack.

3) While the cakes are cooling, paint the gold bars: in an egg cup or something similar, mix half a teaspoon of gold lustre dust with half a teaspoon of vodka or ouzo, until you have a smooth liquid. With a paintbrush, evenly apply the gold lustre to the fondant bars- I find that it helps to paint in lines, one next to the other. Allow the bars to dry. If you want to paint the bottoms as well as the top and sides, I’d suggest you paint the top and sides first, allow them to dry and then paint the bottoms after Step 4, while you’re waiting for your caramel to cool.

4) Next, make the caramel. In a saucepan melt the butter, golden syrup and condensed milk together. Once the ingredients are melted together increase the heat and boil for 5-10 minutes, stirring continuously with a wooden spoon until the caramel has turned a golden colour and reached soft ball stage.
(normally you can tell that soft ball stage has been reached by having a jug of cold water handy: take the caramel off the heat and drop a tiny bit of the caramel into the water- use the wooden spoon obviously because sugar can be hooooot! Put your hand in the water and try to mould the caramel into a ball. If you can you’ve reached soft ball stage and if it’s too soft for that, return the caramel to the heat and try this test again in a minute or so)
Once soft ball stage has been reached, leave the caramel to cool for a few minutes. While it cools, use a skewer to poke holes into the centre of the cupcakes and paint the bottoms of your golden bars (if you so desire).

5) Once the caramel is cooled enough to handle, spoon it into a piping bag or syringe, fitted with a small round nozzle, and pipe the caramel into the holes you made in the cupcakes. If you don’t have a piping bag or syringe, just make some holes in the cupcakes with a teaspoon and then spoon the caramel in. At this stage sprinkle some popping candy onto the caramel poking out from the cakes- this will make the popping candy stick for sure! Leave to set while you make the icing.

6) Make the chocolate fudge icing. In a heatproof bowl set over a pan of simmering water, melt the chocolate. Take off the heat and gradually mix in the butter, stirring after each addition. Once the butter and chocolate are completely melted together gradually sieve in the icing sugar, beating well after each addition. You may find the chocolate seizes up with the addition of such a dry ingredient- in this case just add a drop of milk to loosen the icing up. To make it easier for myself I just add a drop of milk with each addition of icing sugar any way. Once the icing sugar is added, you should have a thick, spreadable consistency. If it is too runny: add more icing sugar. If it is too thick: add more milk. Simple as.

7) Assemble your cupcakes! Spoon the icing into a piping bag or syringe, fitted with a medium star nozzle. Starting from the outside, pipe a swirl of icing onto each cupcake. Alternately you can spread the icing on with a knife. Make sure you save a little icing to adhere the gold bars to the cakes. Sprinkle more popping candy onto the icing. Attach a golden bar to each of the cupcakes by piping a small amount of icing onto the undersides of them and placing them as you desire on the icing swirl (the extra icing just adds…scaffolding to hold the golden bars up on the icing swirls).

8) Enjoy :D (in this warm weather I suggest storing the cupcakes in the fridge, however they taste best at room temperature).


Friday, 25 July 2014

Tea Loaf...

As of late I have been residing with my lovely Grandparents during my search for a part-time job. After being here on and off for a good 3-4 weeks now I thought I should do something to show my appreciation. They haven’t asked for rent (yet!) but the second best thing, I thought, would be to bake them something. So that’s what I did. One of my Grandad’s favourite types of cake is a fruit cake or something of that variety so I thought I’d make a tea loaf, having the fancy for one myself!
With all the glamorous glitter dusted cupcakes and fusion flavoured brownies available nowadays, I think we sometimes forget about the simple homely flavours of a fruit loaf. It’s sweet, light and more filling than a biscuit. AND you even have the added extra of having butter on top of it or not. I suppose some people would say it’s a bit common to have butter on your tea loaf. But sod it, if you can add something to make it taste even more indulgent why not?
This was a typical situation in which I remembered having a really good recipe for such a baked good years ago. However I have since lost the tattered piece of paper on which I wrote the random recipe. So I did what all good modern people do and googled it, finding this recipe from womanandhome.com. I followed this recipe, except I added glacĂ© cherries and missed out the nutmeg (didn’t have any) too. The recipe also specified sultanas and currants as two separate ingredients. To make shopping easier, I just bought a bag of mixed fruit to cover both.
The good thing about a tea loaf is that, it’s so simple to put together- you cannot go wrong. However I cannot control how the batter reacts in the oven (hence the slightly deformed blob on the side of the loaf!) But who cares right? It's homemade after all... 

So here’s the recipe:
500g/18oz dried mixed fruit (raisins, sultanas, currants, mixed peel etc)
250g/9oz caster sugar
375ml/ 13fl oz cold tea
1 large egg
500g/ 1lb 2oz self-raising flour
1 tsp mixed spice
50g/ 2oz glacé cherries (cut in halves)

1) Soak the mixed fruit and the sugar in the cold tea. For better absorption of the tea flavour, it is advised to soak the fruit overnight. I only soaked them for half an hour and it tasted just fine- you can make up your own mind how serious you want to get about your loaf ;).
2) Preheat the oven to 180°C/ 160°C fan/ 350 F/ Gas 4 and line a 2lb/ 900g loaf tin with baking paper. Add the egg to the mixed fruit and mix in well. Sift the flour and mixed spice into the bowl and mix the batter until well blended. Add the halved cherries and fold through the mixture.
3) Pour the batter into the loaf tin and bake for 1 hour- 1 hour 20 minutes, or until a knife/skewer inserted comes out clean. Check the cake every 20-30 minutes to check if it’s browning too quickly on top (admittedly mine did). Leave to cool before slicing. Serve on its own or spread with a dash of butter. Perfect with a cup of tea!

Sunday, 29 June 2014

Chocolate chip cookies


A few years ago my best friend gave me a cookie recipe, having tried it herself (best friend you know who you are!). This recipe was supposed to create a chewy cookie and incorporated sugar-coated chocolate drops. This recipe certainly delivered and started my obsession with the well discussed topic among bakers everywhere, of how to bake a 'chewy cookie'. Since then I stuck to this recipe as a basis and swapped and changed a couple of things, until I got to the version of the recipe below which makes the more...preferable cookie of choice...for my family and I (Thank you best friend for giving me this gift!).

 I know there are many cookie recipes out there. This is because everybody has their individual preferences in a cookie. Some like them soft and chewy and others like them crunchy enough to dunk in their mug of tea. I personally like a soft chewy cookie, which is what this recipe should result in. I have used this recipe for a good couple of years now and I think I will continue to do so. From my experience, I would say that the key to a chewy cookie is a) the addition of golden syrup and b) taking the cookies out of the oven at the opportune moment- when they are just turning light golden but still somewhat pale in the middle. They will look under-cooked and it will seem unnatural to take them out of the oven. Your judgement will say "Just a couple more minutes longer". I don't normally advise people to go against their own judgement however in this instance it's worth it. Just when they're turning golden but still a bit wobbly in the middle and that moment of indecisiveness whether to leave them in or take them out of the oven hits you, ignore your judgement for the sake of a chewy cookie.Of course if you prefer a more crunchy cookie, just leave them in the oven a bit longer until they are more golden. 
On another note, I am a fan of chunky irregular chocolate chips so I always just buy a bar of chocolate and chop it roughly. However, for convenience and if you're a regular sized chocolate chip fan, by all means buy the chocolate chips from the baking aisle. 

Here's my recipe:
3oz caster sugar
3oz light brown muscovado sugar
6oz margarine
2 tablespoons golden syrup
1 teaspoon vanilla extract
9oz self-raising flour
8oz chocolate (milk/dark/ white or a mixture)

1) Preheat oven to 170°C. Grease and line a baking tray. Chop the chocolate and set aside.
2) Cream the sugars, margarine, golden syrup and vanilla extract together until pale and creamy.
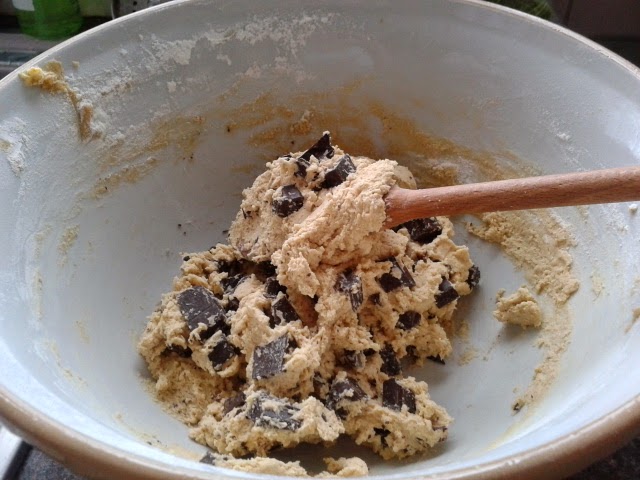
3) Sieve in half the flour and thoroughly mix into the sugar/margarine mixture. Add the chocolate and mix into the dough.
4) Gradually add the rest of the flour, ensuring the flour is mixed in completely after each addition. The dough should be stiff enough to mould with your fingers but still soft. (See picture below)


5) Take one heaped tablespoon of dough per cookie and set on the tray- approximately 6 heaps per tray. Squash the heaps of dough down a little to encourage the cookies to spread. Bake the cookies for approximately 10-12 minutes or until lightly golden. The cookies will still seem 'doughy' in the middle when you first get them out of the oven. Allow them to cool for a minute or two on the tray before lifting them off with a spatula and placing on a cooling rack. Good to eat any time of the day. AMAZING fresh from the oven. Enjoy!

Thursday, 26 June 2014

Hello Cupcake! ;)

Hi,

My name's Kristina and I love to bake! (If you haven't guessed that already, judging by the theme of this blog). I've been baking for as long as I can remember. Pretty much everything I know, I have learnt from my Mum. I have very fond memories of making fairy cakes with my Mum: mixing the cake batter, dolloping lots of icing on top of the cupcakes and dipping them in sprinkles...mmm sugary goodness! 

Despite now being 21 and away from home at uni most of the year, my Mum is still my baking mentor, to this day. OK she doesn't tell me what to do anymore, but when I'm home and indulging in some baking time in the kitchen she always pops her head in with a "Everything ok in there?" or an "Oh..doing it like that are you?" If I was a total diva I'd say I refuse my Mum's help nowadays, but in fact I still ask her for advice time and time again- she's like my walking baking encyclopedia!

So thanks to my Mum I've always been surrounded by baking and frankly, now I don't think I can live without it! It's my hobby, my stress relief, my me time and my joy I love to share with others.

On that note, that's why I have decided to write a blog about my baking ventures. I will post pictures of my bakes on here and write about them too. Not gonna lie, I don't have an all singing camera, just a regular digital, so the photos won't be extraordinary. And I don't take myself too seriously; trust me I have good bakes and some serious MIS-BAKES. This is just going to be my way to express myself about a hobby I just LOVE! <3

Kristina
x